

We have many users with Anytone HT’s that are using the code plug put together by W0DFU. With this code plug we have mapped certain radio functions to the customizable buttons on the radio. This has caused some confusion for a few folks who do not program their radios or interact with the code plug software where you can see what the buttons do. And since these buttons are all customizable there’s no “manual” per se. This article is to provide a reference for our users using this code plug unmodified. For the full manufacturers manual for this radio please visit www.connectsystems.com
The photo of the radio above shows the current code plug with the “Analog Repeaters” zone selected and the “Bailey” channel selected (Bailey Repeater)
The Radio
Below is a reference diagram from the Anytone manual identifying the buttons.
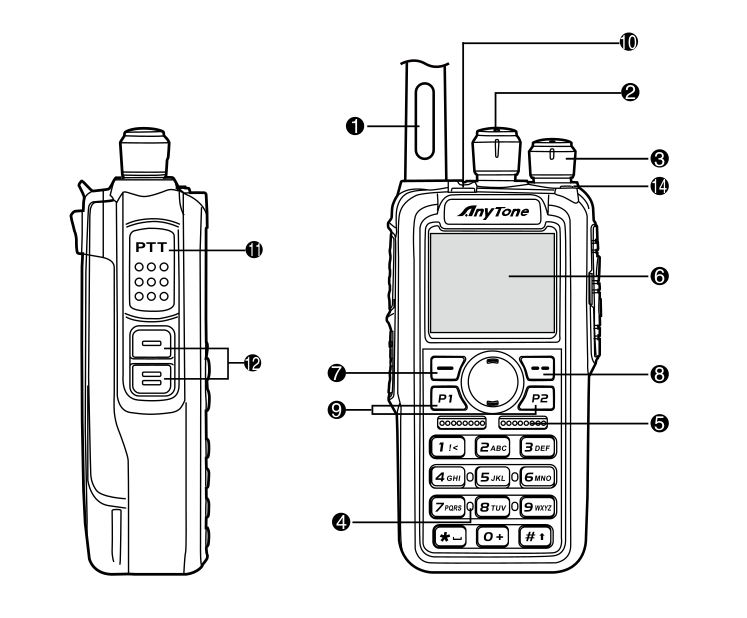
- Antenna
- Channel Switch – Use this dial to cycle through channels in your current zone
- Power/Volume Switch
- Mic Input
- Speaker
- LCD Display
- Menu Key
- Exit Key
- P1 and P2 keys – Customizable
- PF3 Emergency Alarm Key – Customizable
- PTT (Push-to-Talk)Button
- PF1 and PF2 keys – Customizable
- Speaker/Microphone Jacks
- Status Indicator Lamp
- Flashes Red – Low Battery
- Constant Red – Transmitting
- Constant Green – Analog Receiving
- Constant Cyan – Digital Receiving
- Flashing Green – Scanning
Not identified in the diagram is the large circular button on the center of the radio face with up/down buttons. This is used to select your current zone and navigate the menus.
The Buttons
In the Anytone code plug software (obtained from www.connectsystems.com you can download the current code plug for your radio using the programming cable and modify the button configuration under Optional Setting -> Key Function (shown below)
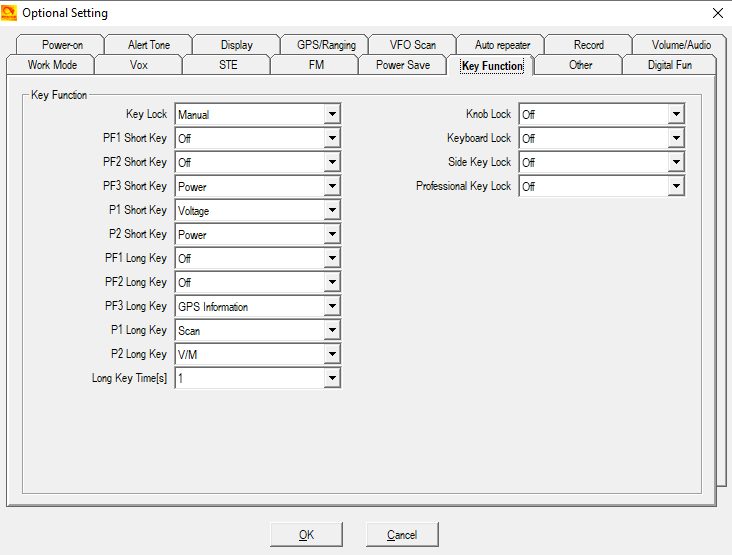
The current code plug is represented in the image above. The current button assignments are as follows
- PF3 Short Press & P2 Short Press – Power (cycles through power settings L,M,H,T)
- P1 Short Press – Display Battery Voltage
- PF3 Long Press – Show Current GPS Information (you will need to enable GPS through your menu or code plug for this to work).
- P1 Long Press – Scan through Scan List
- P2 Long Press – Change between VFO and Channel Mode (VFO you dial the frequency you want manually, Channel mode you can cycle through your programed Zones and Channels
There are lots of additional functions available for you to customize. For the purposes of keeping it simple for most users we have not enabled a lot of features. Feel free to reach out to one of us if you have any questions about making your own customization.

